The "Special Topics" blog posts focus on additional design
details, testing, & performance of my CNC Router
details, testing, & performance of my CNC Router
|
This post will not be about the electrical details of home and limit switches but rather on my choice of hardware and how I incorporated them into my fixed gantry design. Due to lack of experience in limit switches and the unknown accuracy they give for repeatable home position I decided to include in the X & Y axis both a set of limits and a separate (more expensive) home switch. An overview of the added hardware and location is shown in the below CAD picture. Note that v03 on the download page now includes this design. 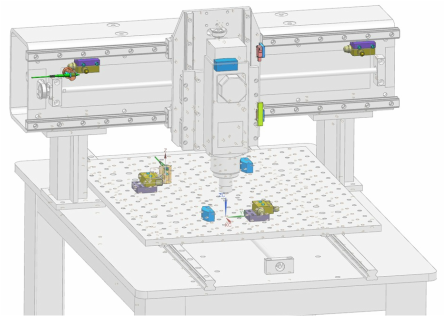 For the Z-axis (pic below) I used a roller lever type micro switch manufactured by Renew, model #RV-125-1C25. These guys are a bit on the cheap side in quality but I wanted to limit the size mounted onto the z-axis. The toggle rail rides on the edge of the Z-axis moving plate while the limit switches are mounted onto the rear permanent plate of the z-axis. Adjustment is made with some slots in the switch brackets and the cables are routed thru the cable tray. 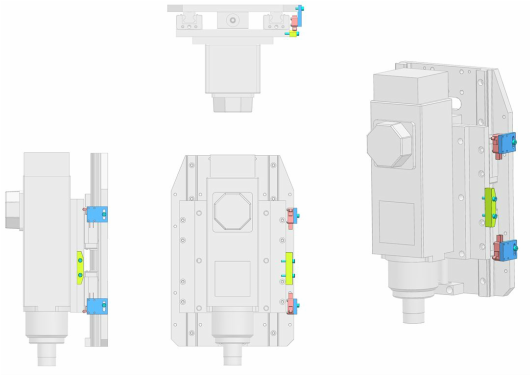 For the X & Y axis I was able to package a much larger limit switch and the quality of those units far exceed the Z-axis. The X-axis table (pic below) used a roller lever style limit switch from CNTD, model #CZ-7141, which is mounted directly onto the Brute machine table with an adjustable bracket and a toggle rail mounted on the underside of the aluminum fixture table. I could have located both switches inline and avoided the need for two toggle rails but this would have resulted in one of the limit switches mounted at the extreme forward location of the machine and I simply did not want to look at the switch when the table was in the extreme -X location so opted for 2 separate toggles which pushes the hardware out of view. Update: After installing the 'conveyor' to protect the ballscrew and rails from chips I got rid of the second toggle ramp on the right side and re-positioned the 2nd switch inline with the 1st on the left side. 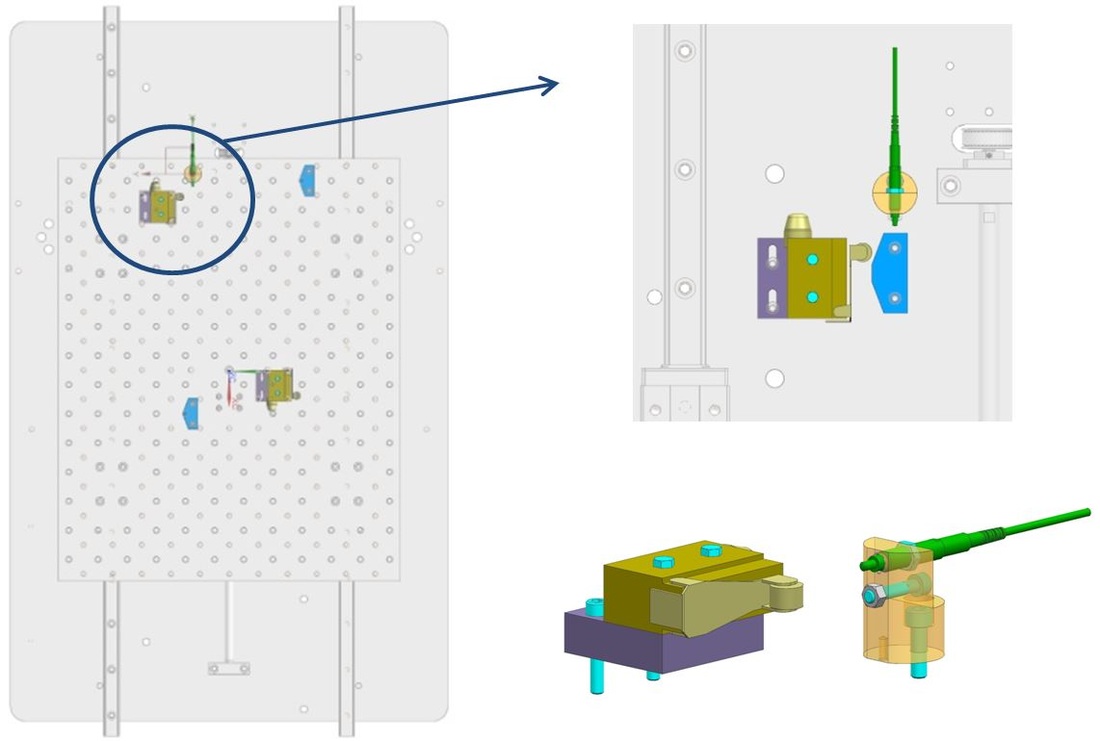 The Y-axis gantry limit switches are button depress style switches from CNTD, model #CZ-7110. I chose this style due to the lack of space between the Z-Axis assembly and the gantry rails for a toggle style and the fact that I could 'hide' the entire switch inside the gantry rectangular beam. The button of the switch is the only part exposed into the moving path of the Y axis gantry and is actuated by a toggle ramp mounted to the back side of the rear z-axis plate. One drawback is the limited adjustability of the switch location due to the hole restriction in the tubing; therefore, adjustment is made by carefully locating the elevation of the button to the toggle ramp. 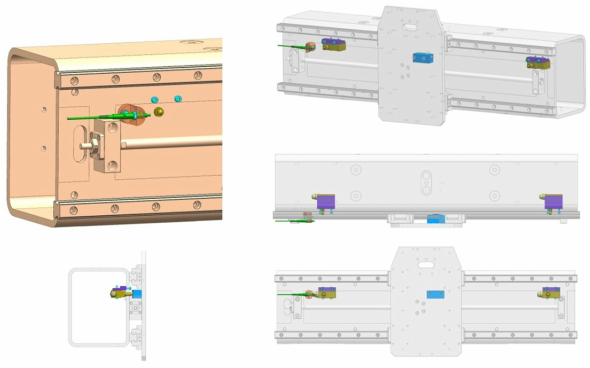 The home switches are higher quality precision contact switches purchased from Misumi (model #MSTKD-EL) at a cost of $60 each. I wasn't certain of the repeatability of the cheaper limit switches (~$7) so decided to use both on the X & Y axis and compare them. The home switches are mounted onto a simple mount made from 1" steel round machined to include both the switch and a stop screw to insure I don't damage these expensive units. Unfortunately at this time Mach4 together with my ESS (smoothstepper controller) does not fully function with both home and limit switches so I've yet to have a comparison for you - I'll update when software is fixed. At this point the limit switches seem to be very repeatable leading me to believe I don't need the separate home switch. You'll notice that the home switch (and one limit which currently acts as home) is located directly at the fixed end of the ball screw. This is because the ball screw incurs significant thermal expansion in operation therefore for the most precise repeatability is obtained at the fixed end of the screw shaft. I was surprised to learn that ball screws typically see about 2-5 deg C thermal change in operation and this results in an expansion of 0.02-0.06 mm (0.0008-0.0023") at my maximum extended position. Also of interest is that precision machines avoid this thermal error by 'stretching' the ball screw to the estimated maximum displacement from the thermal expansion and fixing both sides of the screw shaft. This shaft now loaded in tension will simply reduce the tension load as the temperature increases and have zero overall length change due to thermal expansion. They also adjust for that stretch of the shaft by manufacturing the pitch to incorporate that stretch... Neat! They talk about how to load the shaft in tension preload and set into the fixed ends but I was discussing this with a colleague and we came up with a simpler (more diy) approach.... all you have to do is heat the shaft to a set temperature (maximum expected) and then mount 'hot' into the fixed ends and when it goes back down to 'shop' temperature it will be in tension. Just need to make sure your end supports are directly connected together with a stiff enough connection to accommodate the tension load. Oh and then have a special pitch manufactured.... ok, definitely not a diy item typically considered. Some pictures below of the manufacturing and build (slideshow format) Cheers.
2 Comments
Leave a Reply. |
Archives
August 2016
Categories |
 RSS Feed