3-Plate Method
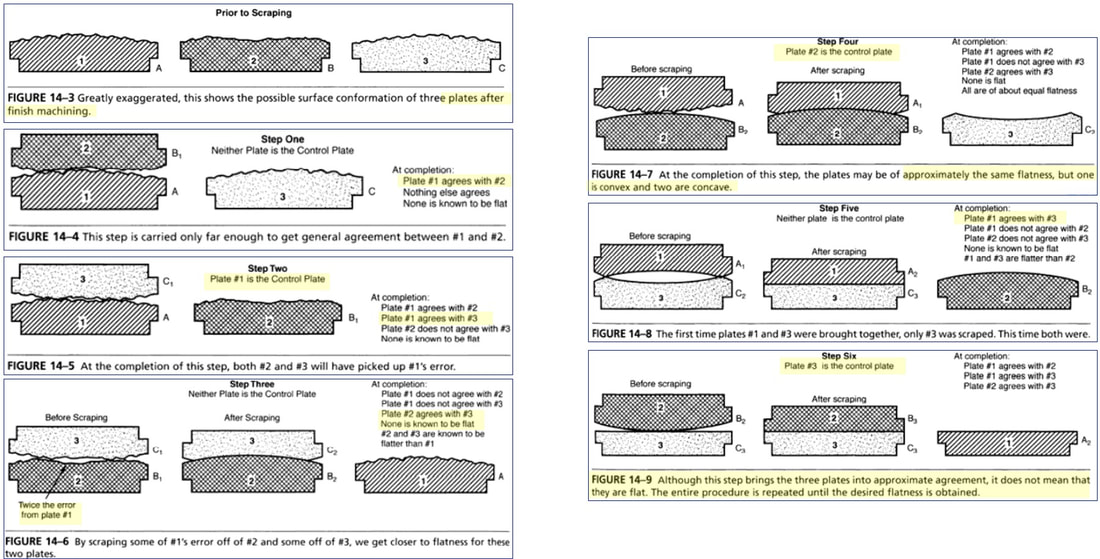
Joseph Whitworth invented the first practical method of making and polishing accurate flat surfaces in 1830 by using engineer's blue and scraping on three trial surfaces. This led to an explosion of development of precision instruments using his flat surfaces as a basis for further construction of precise shapes. Below is the basic outline for this process as explained in "Fundamentals of Dimensional Metrology" by Ted Busch.
Joseph Whitworth invented the first practical method of making and polishing accurate flat surfaces in 1830 by using engineer's blue and scraping on three trial surfaces. This led to an explosion of development of precision instruments using his flat surfaces as a basis for further construction of precise shapes. Below is the basic outline for this process as explained in "Fundamentals of Dimensional Metrology" by Ted Busch.
Now Tom Lipton over at YouTube channel OxTools has an excellent video demonstrating this method using lapping on 3 small cast iron discs -> Video Link
These small 6" discs are not suitable for reconditioning a granite surface plate but this is where I start my project to learn the basics of the 3-Plate method & begin to explore some basic tools required throughout my project. Below is a series of pictures of my 6" disc lapping process. The flatness off the lathe was about 0.001" (25 µm) and as you can see traditional lapping grooves are machined into the discs. I built a holder for the bottom lapped disc out of some scrap MDF and went about the lapping process as outlined by the OxTools video.
These small 6" discs are not suitable for reconditioning a granite surface plate but this is where I start my project to learn the basics of the 3-Plate method & begin to explore some basic tools required throughout my project. Below is a series of pictures of my 6" disc lapping process. The flatness off the lathe was about 0.001" (25 µm) and as you can see traditional lapping grooves are machined into the discs. I built a holder for the bottom lapped disc out of some scrap MDF and went about the lapping process as outlined by the OxTools video.


During the lapping process it's fairly easy to see progress and within some hours the entire surface of all 3 discs were being covered. They look good but the flatness is still unknown at this point as they can be convex or concave. At this time we need to introduce some inspection tooling. The first is a Spherometer which is a simple comparative gage to measure relative concave/convex variation from a known reference plane. This is an important 'In Process' gage to determine when the lapped surfaces are approaching a flat plane. The design of a spherometer is very simple with 3 points to rest on the surface and a center location for measurement. I used some fine adjustment ball end points but this is not required if using a central measurement device which can be zeroed. As it's a comparative gage it's only going to tell you the variation from a reference and here you'll see I'm using a granite surface plate to first zero my Spherometer and then transferring to the discs.


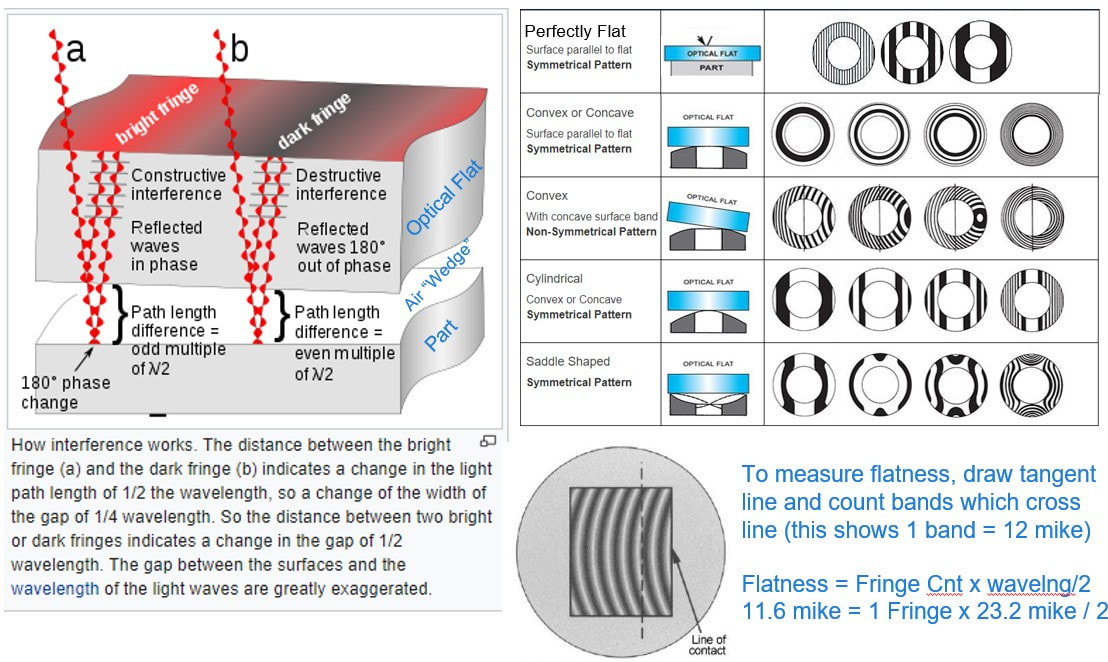
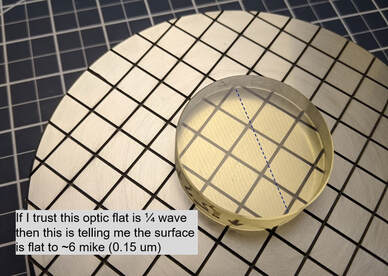
Once the Spherometer is measuring an accuracy of 'zero' we know the surface flatness to about +/-0.0001" (2.5 µm) but this isn't enough. To achieve our 'mike' (millions of an inch) level flatness we need to introduce a second tool - the Optical Flat. This piece of glass which is lapped extremely flat (6 mike, 0.15 µm), together with a single wavelength Helium light source, exposes a fringe pattern due to light interference when placed onto a flat surface. The below image explains this a bit more in detail alone with the result of my lapping experiment.
|
|
Making the Cast Iron Lap for Granite reconditioning
Now with the success of making the 6" lap completed I move onto the real project task of making the lap which will then be used to recondition the Granite Surface Plate. It took some patience but I was finally able to obtain two 14"x10" used cast iron laps. These 2 laps are an original Taft-Peirce design but mine are marked J.C. Busch Co. Milwaukie WI who likely just took over the design from Taft-Peirce. You can still purchase these "1600 Series - Duplex Bench Plates" from Busch Precision for about $400 each. My cost was $60 for both laps but they were in very poor condition and needed some resurfacing prior to starting the lapping process as you can see below.
Now with the success of making the 6" lap completed I move onto the real project task of making the lap which will then be used to recondition the Granite Surface Plate. It took some patience but I was finally able to obtain two 14"x10" used cast iron laps. These 2 laps are an original Taft-Peirce design but mine are marked J.C. Busch Co. Milwaukie WI who likely just took over the design from Taft-Peirce. You can still purchase these "1600 Series - Duplex Bench Plates" from Busch Precision for about $400 each. My cost was $60 for both laps but they were in very poor condition and needed some resurfacing prior to starting the lapping process as you can see below.


The flatness off the mill from facing was not as good as the 6" discs off the lathe and I really would have liked to perform a grinding operation before lapping. If you have the means a grinding operation is highly recommended to reduce the overall lapping time required.


Now 2 laps gives me 4 surfaces but prevents me from using the exact process as detailed for the 3-Plate Method. What I ended up doing was marking surfaces A, B, G, H with G&H representing a combined "C" surface and mixing these into the below sequence steps. Results were very good but I can't 100% commit to saying this worked because just when I finish lapping & verifying with optical flat, BUT prior to inspection with an autocollimator, I found a 3rd 'real' Taft-Peirce lap and decided to restart the process on all 6 sides (2 sets of 3). Luckily this new plate was in good condition and working it in did not drastically delay my project. I thought about omitting this detail from the writeup to avoid confusion but I'm really confident my below approach would have been ok. (but fair warning).
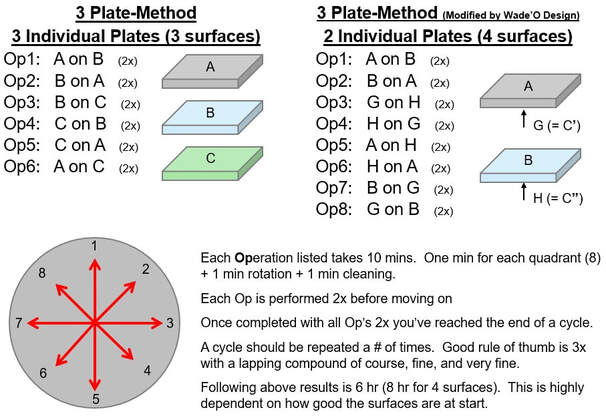
Note that the "4 Surface Method", although increasing duration slightly, reduces material cost while at the same time increasing production by resulting in an additional flat surface.
The process might seem mundane but I found it rather enjoyable. I put some good tunes on, limited duration to max 2 hrs, and it became nearly a meditative time of day. One tip which became a must for me was to mark the quadrant numbers and use a stopwatch. In this way you'll never loose your place while at the same time not paying too much attention... set the timer to 9 minutes and immediately it start countdown from 8:59 to 8:00 which you should be at quadrant "8".... 4:59 to 4:00 is quadrant "4" etc, with the last minute 0:59 to 0:00 the rotation.
And now below a series of pictures of a surfaces which I didn't pre-machine. You can clearly see the history of lapping parts on this surface disappear.


We'll it's been over 2 years since this project started and this morning went to my video folder and found some really detailed content which I had forgotten about. Seems I'll be posting some videos on YouTube and will link them all below. But first just to finish up my written post I'll show you the optical flat & autocollimator measurement results of my finished rectangular laps.


A few last notes before I edit the archived videos of the lapping process.
You'll notice above I'm using now a large 4" 1/10th wave Optical Flat which I obtained off ebay so my local flatness capabilities is improved. Also note that the total flatness value of 108 mike was obtained with an autocollimator which will be explained in detail in the "Inspection" section later. Also of note is that between autocollimator and optic flat I needed to spend considerable time finish lapping with diamond slurry to obtain the optical quality required to use the Optical Flat - this likely improved the overall flatness a small amount.
At one point in the video I estimate the time at 10 hrs and I think this was only about 1/2 complete due to the poor start quality of the 2 original rectangular plates. Grinding the surfaces pre-lap and using only 3 surfaces would cut this time down considerably.
I am ultimately satisfied with the decision to lap all 3 plates (6 sides) as now I have each side dedicated to a specific operation. Two flat sides are for granite reconditioning, both a rough and fine process designation; two sides which have the grooves are dedicated to lapping metal parts, again a course and fine; then I designate one lap for "shop work" with one side always having sandpaper attached to finish aluminum machined parts (see this excellent video by RobRenz -> Link, for making a shop sandpaper lap).